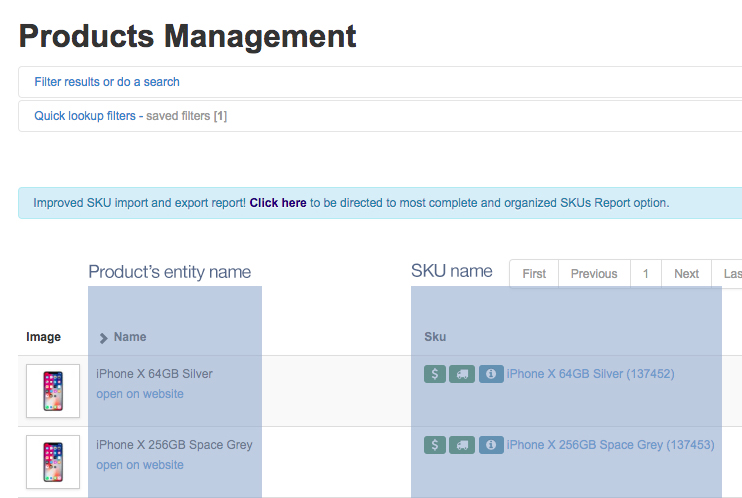
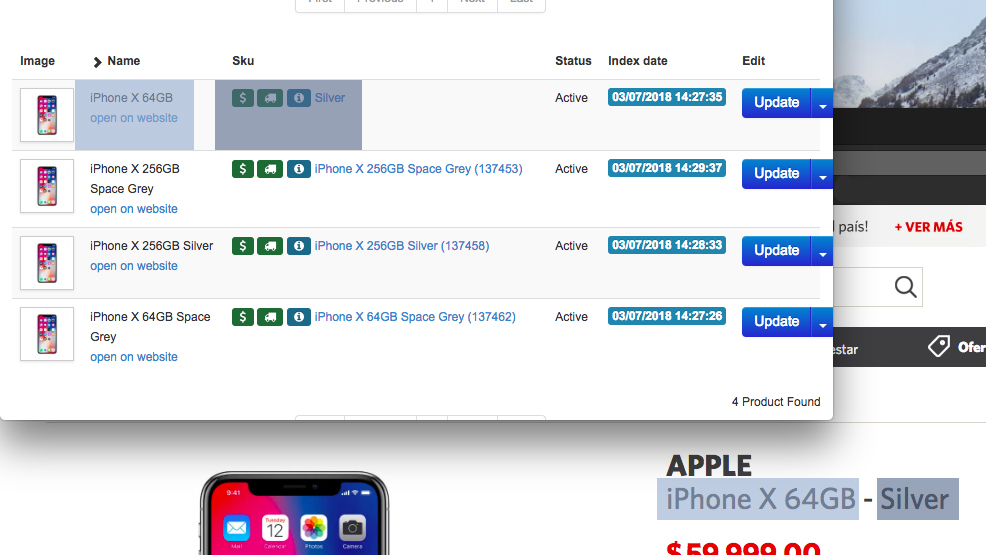
Naguel

I'm Nahuel, and these are my work experiences, ideas and thoughts as a web developer working on the eCommerce industry.

Add related posts to Ghost blog

Add related posts to Ghost blog

The related posts are quite easy to add to Ghost if you have some basic knowledge on how to edit your current theme (there's no option to turning this ON and OFF on the Admin, unfortunately, so you must do it on the theme itself).

If you open your theme's files you would see a post.hbs template which is the one for the articles (for "this page you are seeing right now", basically), and the block expression {{#post}}...{{/post}} would be the one containing everything related to the post itself.

Outside that expression, after it, we want to add the related posts taking advantage of the {{#get}} helper.

{{#get}} is a special block helper that makes a custom query to the Ghost API to fetch publicly available data.

get documentation for Functional Helpers by Ghost

Clearly, you can use this helper to get the related posts anywhere you want, like on the sidebar of the blog if yours have one, or in a page instead of a post (but I personally like them at the end of an article).

Let's say you would like to get a list of related posts based on the tags of the current one, which can be done by filtering the data on the filter attribute.

{{#get "posts" filter="tags:[{{post.tags}}]+id:-{{post.id}}" as |related|}}
	[...]
{{/get}}

In this case the filter attribute also contains id:-{{post.id}} to ignore, from the list of posts we are getting, the current article (we wouldn't want to suggest as related post the same post the user just read).

You can add as many filters as you want using the + sign as separator.

Inside this helper, the related "object" will be the one containing all the related post, so you just need to "loop it".

{{#get "posts" filter="tags:[{{post.tags}}]+id:-{{post.id}}" as |related|}}
    <div class="related-posts-wrapper">
        {{#foreach related}}
            <article class="{{post_class}}">
                <a href="{{url}}">{{title}}</a>
            </article>
        {{/foreach}}
    </div>
{{/get}}

Once inside the foreach you are in the context of the post, and then you can just get whatever you want from that post such as the {{url}}, {{title}, etcetera.

You can limit how many post to show by using the limit attribute on the {{#get}} helper (15 by default, which seems like too much)

{{#get "posts" limit="2" filter="tags:[{{post.tags}}]+id:-{{post.id}}" as |related|}}
    ...
{{/get}}

The related posts can be anything you like and you would like to consider as related posts, as you are not limited to that filter for the tags I used as an example.

I'm currently using tags:[{{post.primary_tag.slug}}] within the filters to only consider those posts that have the primary tag of the current post as a tag in any position, as I think those posts would be more relevant to the current one.

{{#get "posts" filter="tags:[{{post.primary_tag.slug}}]+id:-{{post.id}}" as |related|}}
    ...
{{/get}}

This is not the same as using primary_tag:{{post.primary_tag.slug}} which is another filter option, in this case to get only those posts that their primary tag is the same as the current post (there's a slightly difference).

Optionally, you can use the featured:true filter option to get those posts that are checked as featured within the Admin.

{{#get "posts" filter="tags:[{{post.tags}}]+featured:true+id:-{{post.id}}" as |related|}}
    ...
{{/get}}

If you have multiple writers in your blog and you want to show related posts where the current author also participates you can use the authors:{{post.primary_author.slug}} option within the filters.

{{#get "posts" filter="authors:{{post.primary_author.slug}}+id:-{{post.id}}" as |related|}}
    ...
{{/get}}

This is different than using primary_author:{{post.primary_author.slug}} where we are filtering by those posts where the primary author is the same.

Refer to the get documentation on Ghost for more ideas on how to filter.

Screwing up badly at work

Screwing up badly at work

Recently I changed some configuration on a client's site that triggered thousands of emails to different customers, forcing our client's Customer Service to handle the same amounts of customers calls on a day that they would have on a normal week, and finally having our client writing an apology email for all affected users saying that there was no data breach in the site.

It was a long day.

Admit it

Shit happens, and people make mistakes. I did on that occasion, I probably will again in the future or somebody else will, but I will be happy if we as a team don't make the exact same mess I did.

The first thing to do when you screw up is to admit it: tell somebody that you screwed up and tell that person how you screwed up exactly.

If there's a big problem, and you alone caused that problem, chances are people will be chasing ghosts to fix something they won't understand completely how it started (if you don't come forward and tell them exactly what happened).

You are the only one that knows, basically (until everybody finds out).

The idea is to change everybody's mind from panicking about a mystery error to focus on how to put down the fire and doing some damage control. Back to my example, everybody was wondering how the emails went out but when I told them it was me changing a setting then everybody move towards finding a solution (emails were still going out at that point).

Really, trying to cover up something is really a stupid idea because, again, shit happens and it shouldn't be the end of the world, and people will find out rather sooner than later.

Say sorry as you should be

Being on the defense on this type of situations is pretty common, but you shouldn't be. You made a mistake, you admitted it, now apologise without making excuses or blaming something (or somebody) else.

As individuals and as a team we should learn some stuff starting with the fact that human error is an actual thing. Saying sorry is as important as learning to accept someone's apology.

Keep in mind that if you didn't screw up this time you could be the one causing the mess next time, so don't believe you are so perfect. At the same time, if you were the cause of all the problems today, relax, somebody else will take the leading role next time.

Not the same mistake twice

When the adrenaline is over and the problem is solved do everything within your reach to avoid the same mess to repeat itself.

Let's try to have new problems, not always the same ones (it's boring that way).

While all human errors can't be eliminated (unless there's no human in the equation) we can always reduce the chances for them to happen by identifying what mechanism we (the team) can put in place to prevent them.

Back to my emails, the setting I changed wasn't on the Live site but on a testing environment, that happens to contain real customer data. In this case the problem was on how we create those testing environments (a fault on the process we have in place for doing that).

The problems could be prevented by improving the processes, adding any necessary documentation, and most important by spreading the information across the team.

Learn from a mistake is not a cliche phrase but instead it's something "tangible".

If you really learned from a mistake you will ended up with more documentation available to the team, a better process in place, and everybody informed of what happened and what can be done to avoid it happening again.


Always keep in mind that La La Land was announced the winner of the Best Movie category in the The Oscars ceremony because somebody handed the wrong envelope. And they improved the process for the following events.

Configure the Terminal to use MAMP's PHP

Configure the Terminal to use MAMP's PHP

By default, after installation, MAMP will make its PHP binaries "available on the browser" while the Terminal will keep on using the system's PHP with its own configuration.

The idea behind changing the Command-line to start using the PHP coming with MAMP and its configuration is to be able to switch rapidly between PHP versions and to have the configuration for PHP in only one place.

Out there you can find enough guides that helps you archive this because, frankly, there are plenty of methods to get this done. This next one is how I personally do it because it's easy to implement and it also covers something most of other guides won't which is configure the Terminal to also use the same php.ini MAMP uses.

Configuring the Command-line to use MAMP's PHP

You need to edit your Terminal's Profile in order to add the following to the end:

#export PATH=/Applications/MAMP/bin/php/php7.1.33/bin:$PATH
#export PATH=/Applications/MAMP/bin/php/php7.2.33/bin:$PATH
export PATH=/Applications/MAMP/bin/php/php7.3.21/bin:$PATH
#export PATH=/Applications/MAMP/bin/php/php7.4.9/bin:$PATH

As you can see I'm adding a different line per PHP version I want to potentially have available on the Command-line (PHP 7.1.33, PHP 7.2.33, etcetera) but having them all but one (PHP 7.3.21) commented with the # at the beginning.

Every time you switch the PHP version in MAMP you should come back to the Profile and leave uncomment the same version so the Terminal and MAMP match.

Your Command-line's Profile file depends on your shell. If you are using the default Terminal coming with macOS chances are the Profile will either be ~/.bash_profile or ~/.bashrc. Mines it's ~/.zshrc because I use Oh My Zsh.

Remember that everytime you change your Profile you need to "reload" it by doing source ~/.bash_profile (or whatever file you are using).

You can check if everything was applied as expected by executing php --ini and seeing the paths are pointing to MAMP.

Configuring the Command-line to use MAMP's php.ini

Here's something interesting about MAMP Pro: it generates, each time it starts, the final php.ini file it will be using during the execution as its content depends on the settings configured on the software’s UI.

For example, if you enable/disable Xdebug on MAMP by ticking/unticking the checkbox on the app, MAMP will regenerate the php.ini file with your configuration (this is basically how MAMP applies any setting change that you perform from the UI).

The final generated php.ini file is located at /Library/Application Support/appsolute/MAMP PRO/conf/php.ini.

We already configured the Terminal to use MAMP's PHP binaries but we also need to configure it to use the generated php.ini by going to /Applications/MAMP/bin/php/php7.3.21/conf (where the not auto generate php.ini file is located) and delete it (after a back up).

Then we need to create a symlink called php.ini for /Library/Application Support/appsolute/MAMP PRO/conf/php.ini (which is the auto generated one by MAMP) by doing:

ln -sf /Library/Application\ Support/appsolute/MAMP\ PRO/conf/php.ini php.ini

The conf folder should ended up looking like this:

Of course the example is for PHP 7.3.21 but you will need to repeat this for the folder of each PHP version you will be using on the Command-line.

This only applies to MAMP Pro as the non-Pro version doesn't generates any php.ini and if you want to change something you need to edit the original file yourself.