Naguel

I'm Nahuel, and these are my work experiences, ideas and thoughts as a web developer working on the eCommerce industry.

Add related posts to Ghost blog

Add related posts to Ghost blog

The related posts are quite easy to add to Ghost if you have some basic knowledge on how to edit your current theme (there's no option to turning this ON and OFF on the Admin, unfortunately, so you must do it on the theme itself).

If you open your theme's files you would see a post.hbs template which is the one for the articles (for "this page you are seeing right now", basically), and the block expression {{#post}}...{{/post}} would be the one containing everything related to the post itself.

Outside that expression, after it, we want to add the related posts taking advantage of the {{#get}} helper.

{{#get}} is a special block helper that makes a custom query to the Ghost API to fetch publicly available data.

get documentation for Functional Helpers by Ghost

Clearly, you can use this helper to get the related posts anywhere you want, like on the sidebar of the blog if yours have one, or in a page instead of a post (but I personally like them at the end of an article).

Let's say you would like to get a list of related posts based on the tags of the current one, which can be done by filtering the data on the filter attribute.

{{#get "posts" filter="tags:[{{post.tags}}]+id:-{{post.id}}" as |related|}}
	[...]
{{/get}}

In this case the filter attribute also contains id:-{{post.id}} to ignore, from the list of posts we are getting, the current article (we wouldn't want to suggest as related post the same post the user just read).

You can add as many filters as you want using the + sign as separator.

Inside this helper, the related "object" will be the one containing all the related post, so you just need to "loop it".

{{#get "posts" filter="tags:[{{post.tags}}]+id:-{{post.id}}" as |related|}}
    <div class="related-posts-wrapper">
        {{#foreach related}}
            <article class="{{post_class}}">
                <a href="{{url}}">{{title}}</a>
            </article>
        {{/foreach}}
    </div>
{{/get}}

Once inside the foreach you are in the context of the post, and then you can just get whatever you want from that post such as the {{url}}, {{title}, etcetera.

You can limit how many post to show by using the limit attribute on the {{#get}} helper (15 by default, which seems like too much)

{{#get "posts" limit="2" filter="tags:[{{post.tags}}]+id:-{{post.id}}" as |related|}}
    ...
{{/get}}

The related posts can be anything you like and you would like to consider as related posts, as you are not limited to that filter for the tags I used as an example.

I'm currently using tags:[{{post.primary_tag.slug}}] within the filters to only consider those posts that have the primary tag of the current post as a tag in any position, as I think those posts would be more relevant to the current one.

{{#get "posts" filter="tags:[{{post.primary_tag.slug}}]+id:-{{post.id}}" as |related|}}
    ...
{{/get}}

This is not the same as using primary_tag:{{post.primary_tag.slug}} which is another filter option, in this case to get only those posts that their primary tag is the same as the current post (there's a slightly difference).

Optionally, you can use the featured:true filter option to get those posts that are checked as featured within the Admin.

{{#get "posts" filter="tags:[{{post.tags}}]+featured:true+id:-{{post.id}}" as |related|}}
    ...
{{/get}}

If you have multiple writers in your blog and you want to show related posts where the current author also participates you can use the authors:{{post.primary_author.slug}} option within the filters.

{{#get "posts" filter="authors:{{post.primary_author.slug}}+id:-{{post.id}}" as |related|}}
    ...
{{/get}}

This is different than using primary_author:{{post.primary_author.slug}} where we are filtering by those posts where the primary author is the same.

Refer to the get documentation on Ghost for more ideas on how to filter.

A blank Ghost blog theme for development

A blank Ghost blog theme for development

This blogs runs on the Ghost platform built with Node.js, with a homemade theme that uses Handlebars, HTML, CSS and JavaScript, and if you are reading this article chances are that you're already a Ghost blog owner and that you're looking to develop your own theme.

The problem with the Ghost default theme named Casper, while it's extremely helpful to learn how to develop a custom Ghost theme, is that it is too complex or "it has too many things" you probably don't want for your blog.

For example, when creating the theme for this blog, I had to "deconstruct" Casper to start building on top of the ashes because I wanted a more simple theme, that has my own code wrote the way I wanted it.

Introducing the Pale Ghost blank theme

The Pale Ghost theme is a blank theme, developer ready, focused on the markup without styles, that already includes all the Ghost features for you to customize or remove in order to create your own theme.

I already searched for Ghost blank themes, and truth be told there are many out there, but none suits my desires. All the blank themes I encounter has too much JavaScript, or they are too much complex to the point they looses they purpose of being a blank theme.

This blank theme in particular is very simple, so you might be spending time in the styling part with CSS/SASS/LESS rather than working on the markup. And if you want to move stuff around, you'll find it's easy with the Pale Ghost theme as it is well deconstructed into different .hbs files for an easy development.

It also includes everything a Ghost theme can deliver, just as Casper, but with a simple implementation. The goal with this theme is to avoid the part where we as developers smack things down before actually building up.

For a more technical description of what this blank theme includes you can check the Pale Ghost theme's GitHub page.

Downloading...

You can download this blank Ghost theme from the Pale Ghost theme's GitHub page, where you'll find the "Releases" section.

Configure a Ghost blog using a custom domain with www and non-www using CloudFlare

Configure a Ghost blog using a custom domain with www and non-www using CloudFlare

Ghost is a blogging platform that you can host in your own web server or allow the company to host it for yourself to save time and stress (and to just focus on writing posts). Think about it as a WordPress site that has been tear down to the basic functionality like write posts, tag them and no more like that.

"Ghost is a platform dedicated to one thing: Publishing." Ghost's About page

But if you are reading this it means that you already know Ghost, you already have a blog hosted by them under an URL like yourname.ghost.io, and you already know it can cause you a big headache to configure your custom domain to point to your blog using both the www and non-www version of your domain, and not just only one as Ghost seems to allow.

I fought with this problem when I created this blog, so probably what I experienced can help somebody now.

CloudFlare DNS and Page Rules configuration

Let's assume you have the yourdomain.com domain and you want to point it to yourname.ghost.io.

Also, let's go a even forward and assume you already add your custom domain to CloudFlare, on its non-www version, because the main problem here is to make both www and non-www work, as Ghost already explains how to get only one of them working.

DNS settings

Access your domain DNS setting within CloudFlare in order to create a new CNAME record that points your domain without www to your Ghost's blog URL.

  • Type: CNAME
  • Name: yourdomain.com
  • Target: yourname.ghost.io

Then, add a new CNAME record, this time for pointing the www subdomain to the domain without it, as follows:

  • Type: CNAME
  • Name: www
  • Target: yourname.ghost.io

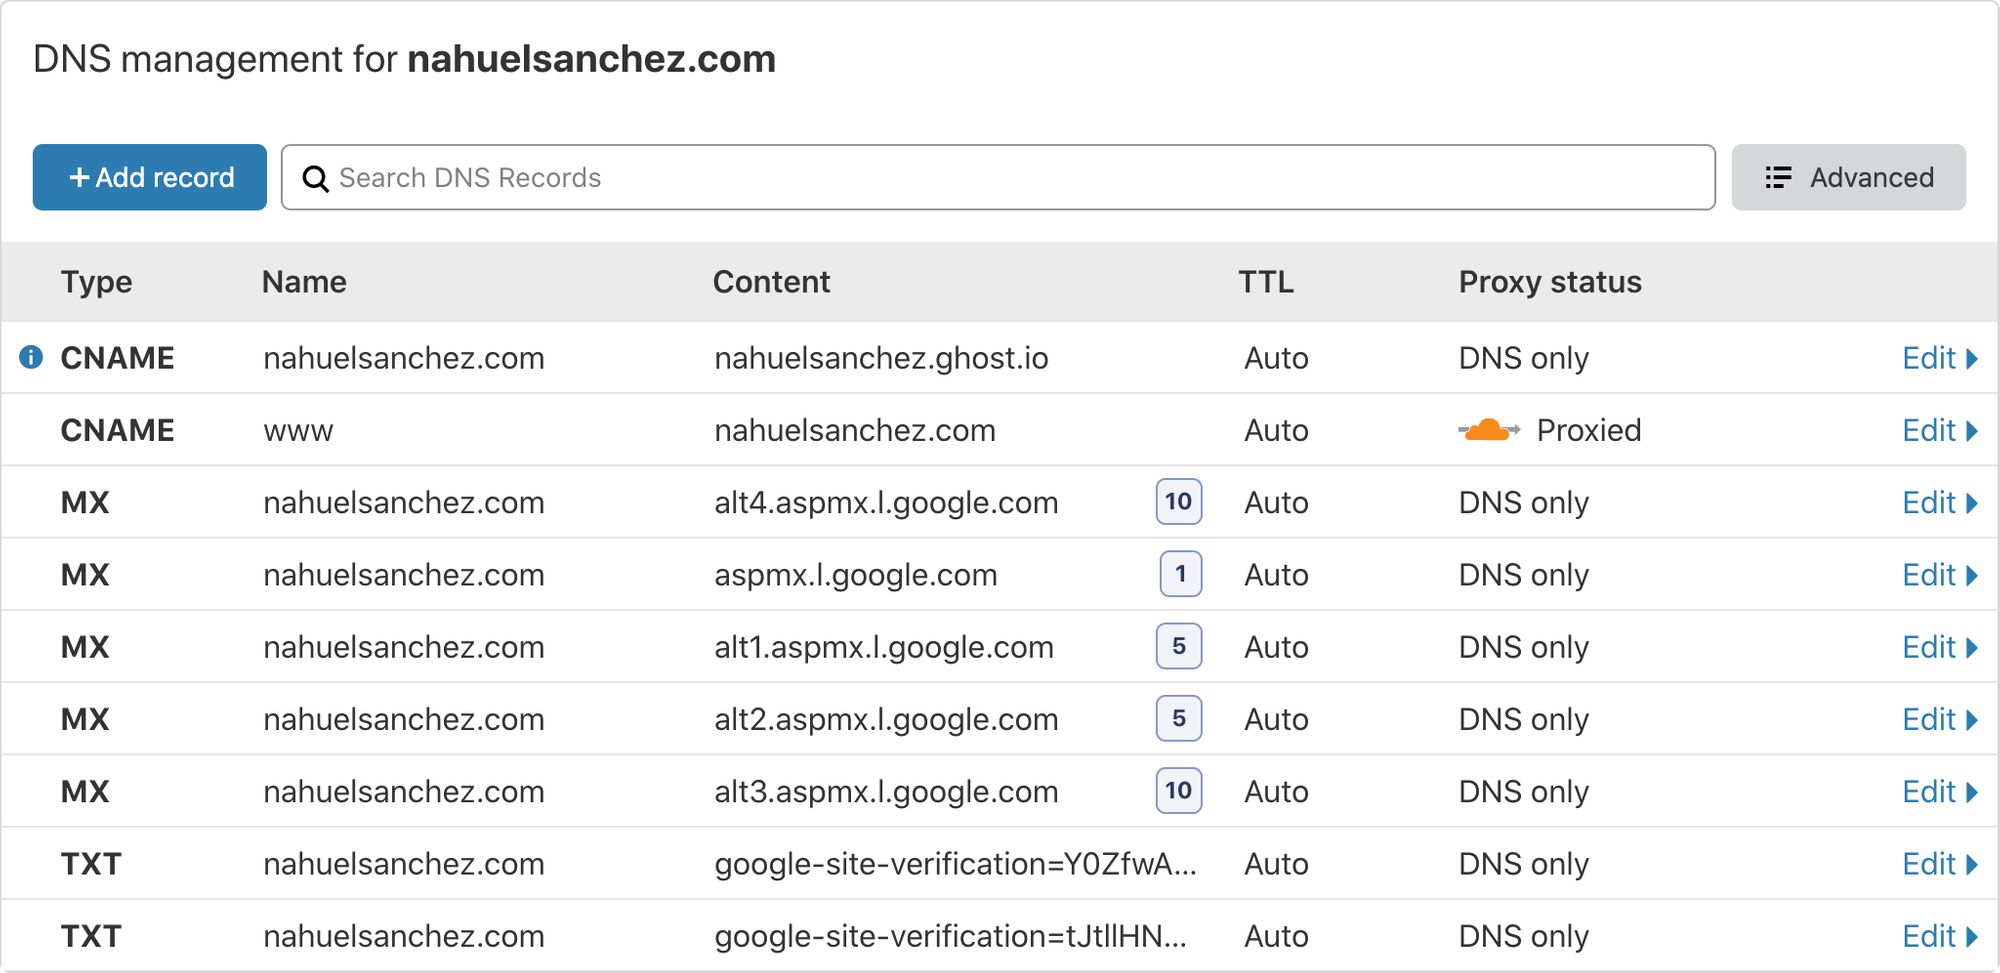
As reference, you can take a look at my configuration in the image below.

The first two rows are the one that matter for this tutorial, and the others are used to make Google G Suite works (so I can have my email hosted by Google).

It is necessary that the configured both CNAME to go through the CloudFlare servers, which means that the cloud icon at the last column should be orange, in order to make use of all the other features from the service.

Page Rules setting

Lucky us, CloudFlare provides a way to configure page rules in order to redirect somebody who types some URL to another configured URL.

In this case we want to redirect the www version of our domain (www.yourdomain.com) to the non-www version of it (yourdomain.com).

Note that my decision was to have the non-www version of my domain as the default one because I just like it that way. If you prefer the other way around, then invert the CNAME configuration on the previous step and configure the following page rules inverted too.

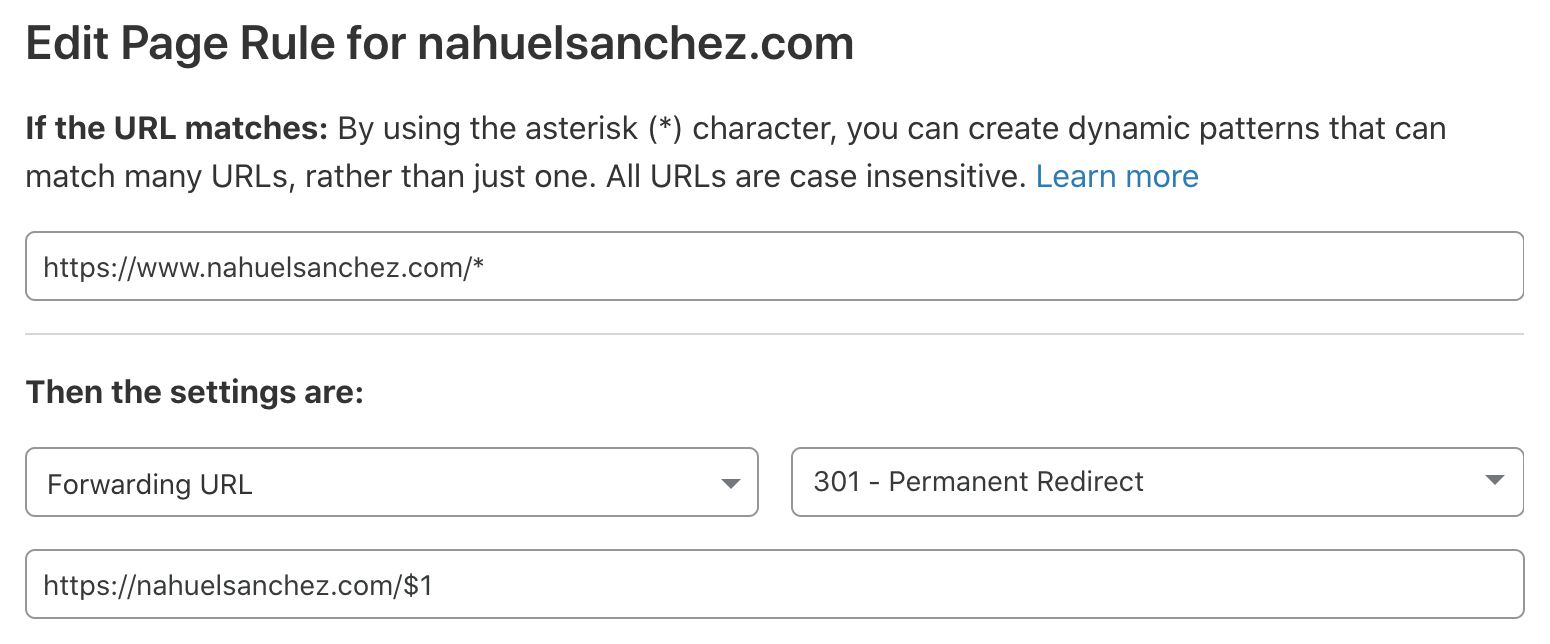
That being said, add a new rule for an URL matching "http://www.yourdomain.com/*", pick the "Forwarding URL" setting, configure its status code as "301 - Permanent Redirect", and enter "http://yourdomain.com/$1" as the destination.

Look at my page rule for this blog to get things even more clear.

Probably you're wondering about the * and $1 on the URLs. They are there to match whatever comes after the domain with www in order to add the same to the non-www domain version once the redirection takes place.

For example, with this page rule as described, when somebody types www.yourdomain.com/this-is-a-blog-post/ it's going to be translated to yourdomain.com/this-is-a-blog-post/.

No visitor is left behind with this configuration.

Ghost Custom Domain configuration

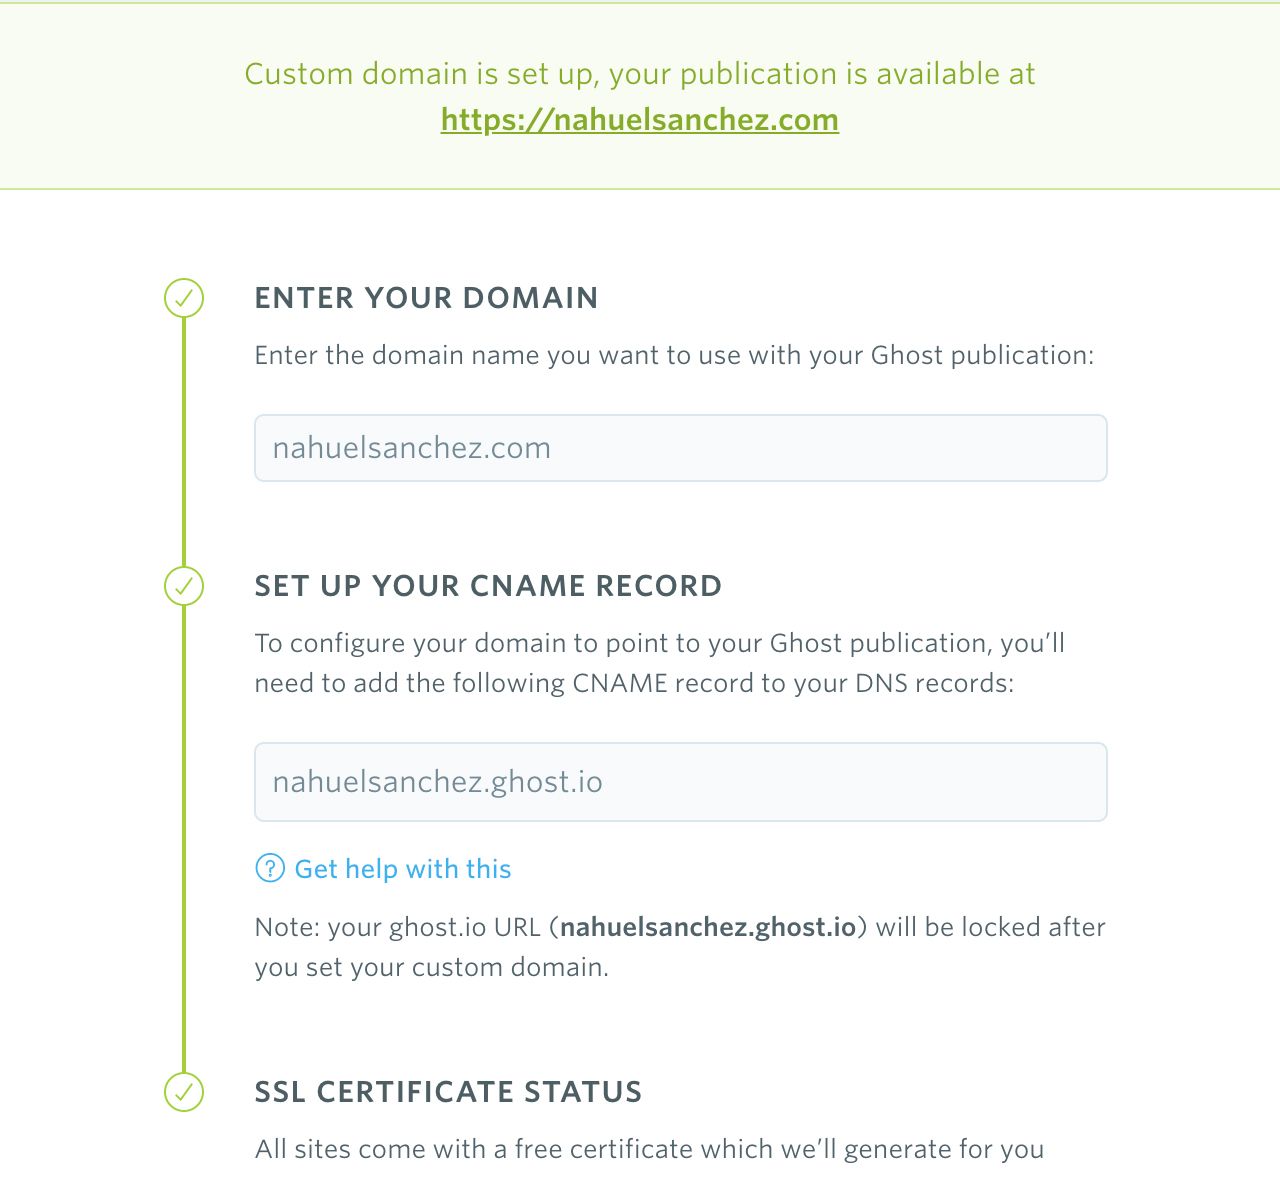
Finally, this whole CloudFlare setup will make sense if you go back to your Ghost blog configuration in order to set the non-www version of your domain as the Custom Domain of your blog.


That's all it takes to have both yourdomain.com and www.yourdomain.com working with your Ghost blog.

If you can't see the results, meaning the redirection is not working for you, first take a break because it could take some minutes to take effect, or blame the cache of your browser (clean your browser cache and try again, or simple change the browser you are using).