Naguel

I'm Nahuel, and these are my work experiences, ideas and thoughts as a web developer working on the eCommerce industry.

Configure a Ghost blog using a custom domain with www and non-www using CloudFlare

Configure a Ghost blog using a custom domain with www and non-www using CloudFlare

Ghost is a blogging platform that you can host in your own web server or allow the company to host it for yourself to save time and stress (and to just focus on writing posts). Think about it as a WordPress site that has been tear down to the basic functionality like write posts, tag them and no more like that.

"Ghost is a platform dedicated to one thing: Publishing." Ghost's About page

But if you are reading this it means that you already know Ghost, you already have a blog hosted by them under an URL like yourname.ghost.io, and you already know it can cause you a big headache to configure your custom domain to point to your blog using both the www and non-www version of your domain, and not just only one as Ghost seems to allow.

I fought with this problem when I created this blog, so probably what I experienced can help somebody now.

CloudFlare DNS and Page Rules configuration

Let's assume you have the yourdomain.com domain and you want to point it to yourname.ghost.io.

Also, let's go a even forward and assume you already add your custom domain to CloudFlare, on its non-www version, because the main problem here is to make both www and non-www work, as Ghost already explains how to get only one of them working.

DNS settings

Access your domain DNS setting within CloudFlare in order to create a new CNAME record that points your domain without www to your Ghost's blog URL.

  • Type: CNAME
  • Name: yourdomain.com
  • Target: yourname.ghost.io

Then, add a new CNAME record, this time for pointing the www subdomain to the domain without it, as follows:

  • Type: CNAME
  • Name: www
  • Target: yourname.ghost.io

As reference, you can take a look at my configuration in the image below.

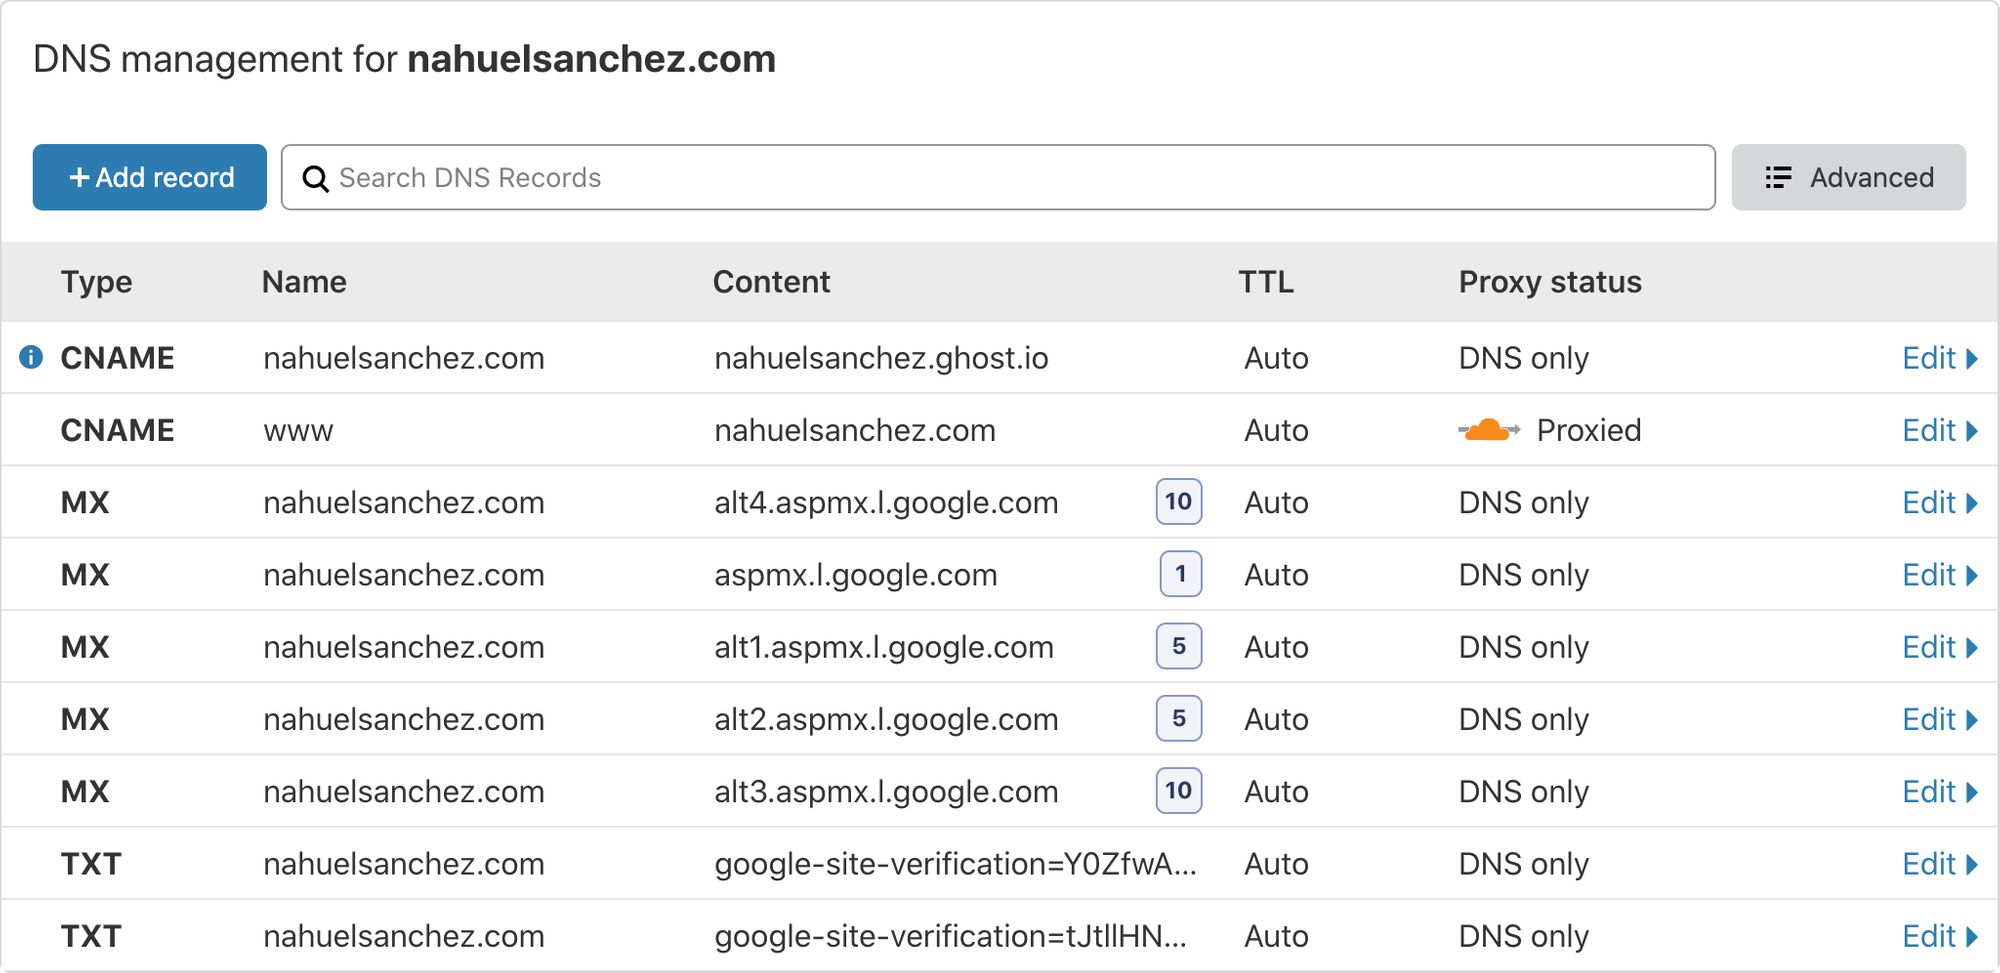
The first two rows are the one that matter for this tutorial, and the others are used to make Google G Suite works (so I can have my email hosted by Google).

It is necessary that the configured both CNAME to go through the CloudFlare servers, which means that the cloud icon at the last column should be orange, in order to make use of all the other features from the service.

Page Rules setting

Lucky us, CloudFlare provides a way to configure page rules in order to redirect somebody who types some URL to another configured URL.

In this case we want to redirect the www version of our domain (www.yourdomain.com) to the non-www version of it (yourdomain.com).

Note that my decision was to have the non-www version of my domain as the default one because I just like it that way. If you prefer the other way around, then invert the CNAME configuration on the previous step and configure the following page rules inverted too.

That being said, add a new rule for an URL matching "http://www.yourdomain.com/*", pick the "Forwarding URL" setting, configure its status code as "301 - Permanent Redirect", and enter "http://yourdomain.com/$1" as the destination.

Look at my page rule for this blog to get things even more clear.

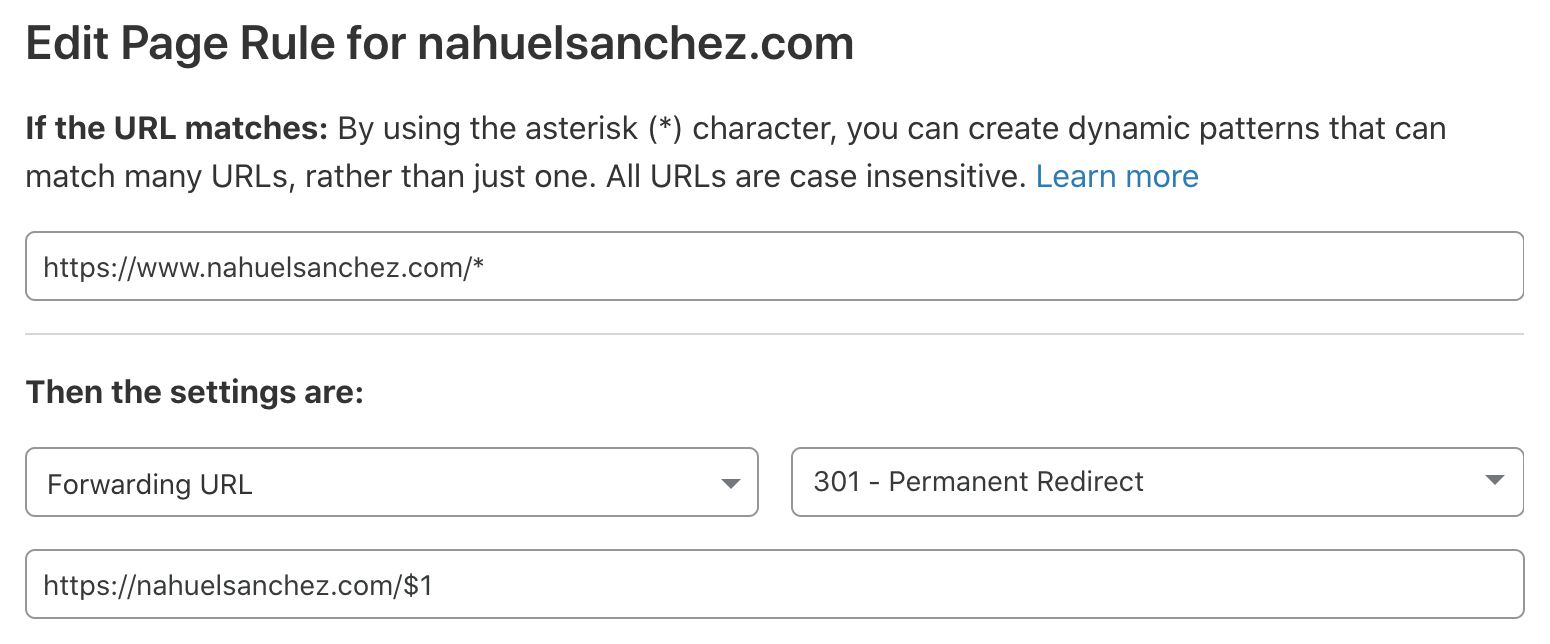
Probably you're wondering about the * and $1 on the URLs. They are there to match whatever comes after the domain with www in order to add the same to the non-www domain version once the redirection takes place.

For example, with this page rule as described, when somebody types www.yourdomain.com/this-is-a-blog-post/ it's going to be translated to yourdomain.com/this-is-a-blog-post/.

No visitor is left behind with this configuration.

Ghost Custom Domain configuration

Finally, this whole CloudFlare setup will make sense if you go back to your Ghost blog configuration in order to set the non-www version of your domain as the Custom Domain of your blog.


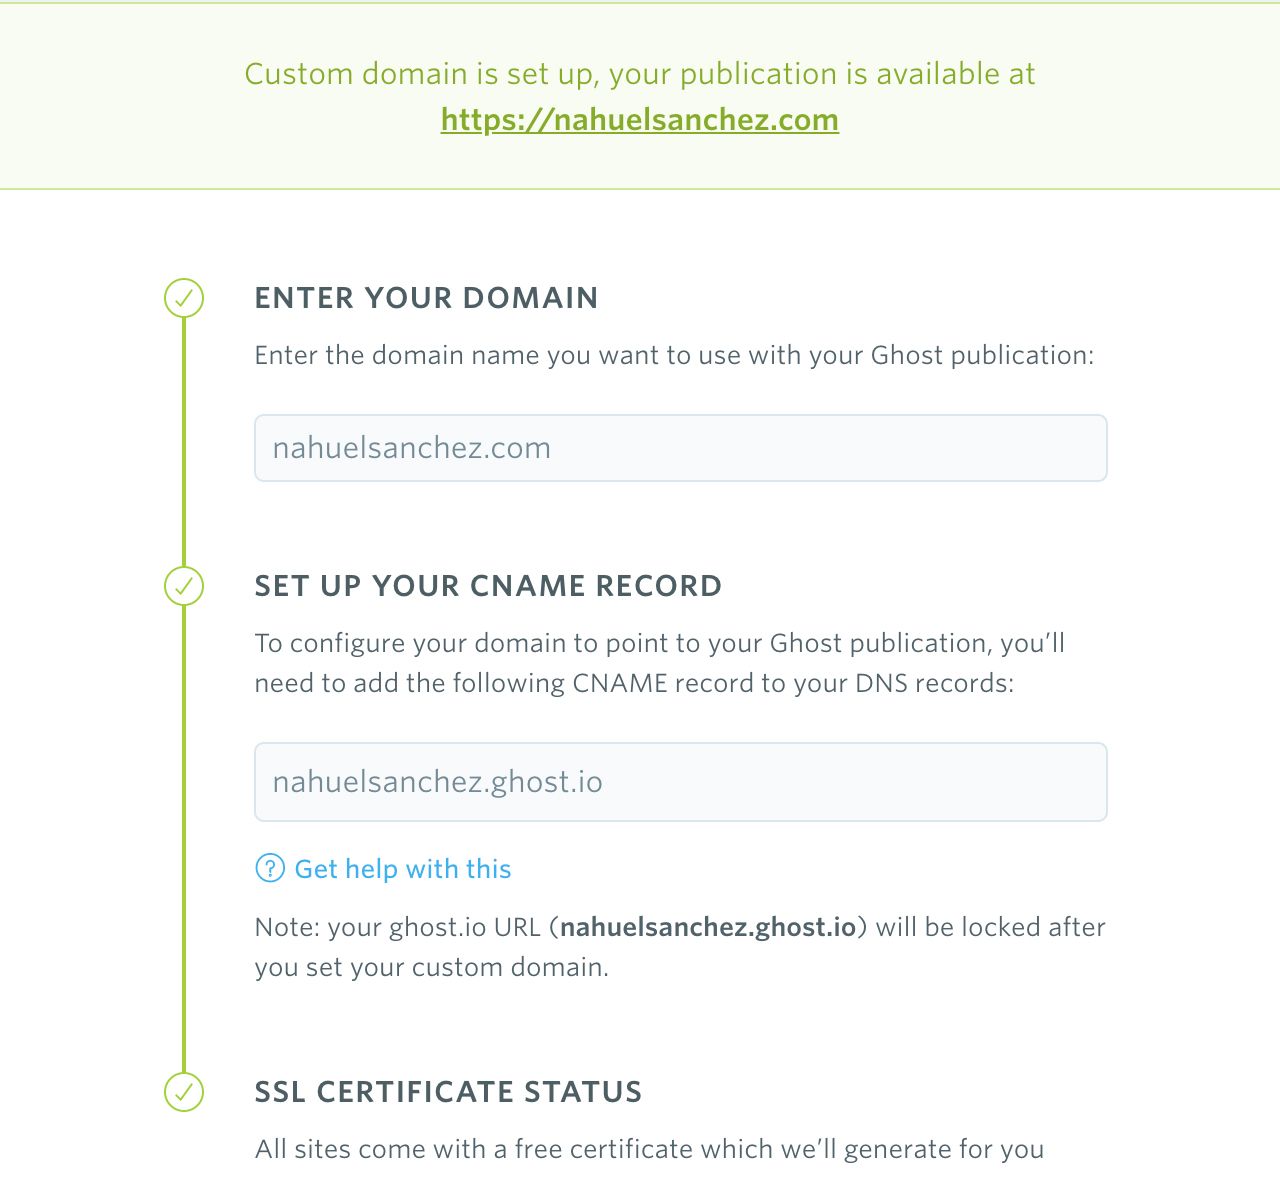
That's all it takes to have both yourdomain.com and www.yourdomain.com working with your Ghost blog.

If you can't see the results, meaning the redirection is not working for you, first take a break because it could take some minutes to take effect, or blame the cache of your browser (clean your browser cache and try again, or simple change the browser you are using).

Differences between POST, PATCH and PUT in VTEX Master Data

Differences between POST, PATCH and PUT in VTEX Master Data

We can thrown five different HTTP requests at the VTEX Master Data: GET, POST, PATCH, PUTCH and DELETE. GET and DELETE are very simple to understand (once for get documents and the other one to delete them), but POST, PATCH and PUT seems like they all do the same thing.

There are small differences between POST, PATCH and PUT that justify the existence of all of them, and knowing this could improve our VTEX implementation and how we interact with the Master Data.

What’s VTEX Master Data?
A database-ish that works as a CRM data repository where we can find clients’ data, orders’ information, addresses and more divided into Data Entities.

POST, PATCH or PUT?

The first one, POST, allows us to create a new document in a specific Data Entity. If the document already exists we won't be able to introduce the new data into the Data Entity.

For example, if we perform a POST request to create a new client with the email johndoe@example.com and name John, but the Data Entity CL already has a client with that email address a new document won't be created.

It doesn't matter if the existing document with the email johndoe@example.com has a different name for the client. Since the email needs to be unique the request will fail and the other attributes like the name will be discards.

On the other hand, PATCH works just like POST in terms that it will create a new document, but if the document already exists then the attributes from the existing document are updated with the new values that we are sending in the request.

Take into consideration that PATCH, in the scenario where the document already exists, will update only the attributes that we are sending in the request. The attributes that exists on the document but are not mentioned in the request won't be affected.

Finally, PUT works as POST too when the document doesn't exists: it creates a new one with the values we're sending in the request.

When using PUT in an scenario where the document already exists it will cause the existing document in the Data Entity to be completed overwritten. In other words, the existing document will be deleted, a new one will be created with the attributes mentioned in the request, and the ignored attributes in the request will be empty in the final created document.

POST, PATCH and PUT in VTEX Master Data documentation

Let me recap. POST to create a new document, PATCH to create a new document if it doesn't exist or to update the values of the attributes in an existing document, and finally PUT to create a new document if it doesn't exist or to overwrite an existing document.

A friendly example

Given an empty CL Data Entity, we perform a POST to create a new document with the following JSON in the request.

{
     email : "johndoe@example.com",
     firstName : "John",
     lastName : "Doo"
}

Since the document doesn't exist, it will be created.

Then, we decided to change the lastName of the document because we spot a typo on it. For this, we use PATCH and the following JSON in the request.

{
     email : "johndoe@example.com",
     lastName : "Doe"
}

After the request the document on the Data Entity will look like the following.

{
     email : "johndoe@example.com",
     firstName : "John",
     lastName : "Doe"
}

Finally, the document became obsolete and we need to overwrite it using PUT and the following JSON.

{
     email : "johndoe@example.com",
     firstName : "Jane"
}

The existing document with that email address will be deleted and a new one will be created, as follow.

{
     email : "johndoe@example.com",
     firstName : "Jane",
     lastName : ""
}

As you saw, lastName is empty.

Install Composer on OS X and use it globally

Install Composer on OS X and use it globally

Magento 2 needs Composer, so let install it on OS X in a way it can be used globally.

Considering that installing Composer will create a composer.phar file, and our intention is to use it everywhere, anytime, regardless the project we're working on, I decided to install it (meaning let the composer.phar be created) in /Applications/Composer (it makes sense to me, but you can choose the destination folder you want).

Installing Composer

First thing first, let's go to /Applications, create the Composer folder, and get in.

cd /Applications/
mkdir Composer
cd Composer

Now, we can install Composer for real using cURL.

curl -sS https://getcomposer.org/installer | php

If everything goes as expected we'll get a nice message saying something like "Composer successfully installed to..." and we can proceed to the next step.

Making it globally available

Now that we have the composer.phar file, we need (or want?) to have it globally available by typing composer in the command line. To achieve this let's start by moving our composer.phar file to /usr/bin/.

sudo mv composer.phar /usr/bin/

And finally let's create an alias on our bash profile.

alias composer="php /usr/bin/composer.phar"

Reload the command line profile, and that's all it takes to get Composer on OS X. You can now go to any folder you want and type composer about. If something nice appears it means everything is okay.

I might be skipping the part where I'm supposed to explain how to edit and reload the bash profile. It was on purpose because it always different depending on the terminal you use (for example mines it's located in ~/.zshrc because I use Oh My ZSH!).

You can try the following in order to access and edit the bash profile.

vim ~/.bash_profile